
The quality of their food photography helps companies like restaurants, food trucks, bakeries, grocery shops, and more succeed. Because of this, it's crucial to ensure that your food photography matches the standards that clients want.
But hiring a professional photographer or investing in pricey equipment is not necessary in order to take excellent food product photos. On something as basic as a smartphone camera app, amateurs may take photos that seem professional. Here are our best advices for food photography!
How to take pictures of food
- Make sure your food is ready for photos by: Display your food such that it highlights its best qualities. Pick cutlery and surfaces that go well together. Place your main subject in the center of the plate, leaving space on the edges.
- Ensure proper lighting Light coming from the sides as opposed to the front. When artificial lighting is not an option, use soft lighting. Recognize strong shadows.
- Play around with framing by trying out various shooting positions. Use lifelike, softer colors that are more palatable. Focus on the parts of your photo that are the most delicious by using depth of field.
- Edit your food images the way a pro: Enhance your appearance. To bring out warm colors and to cancel out cooler ones, adjust the white balance. Only gently increase the saturation, brightness, and contrast.
- Rules are meant to be broken, so don't be scared to use your imagination. Your food images might stand out by using an original perspective, color scheme, or composition.
1. Prepare your food to be photo-ready

Placing is the first step in making the user believe that the food being photographed is as juicy and mouthwatering as it appears to be when they have only the image to go on. You should think about how to organize your food in an aesthetically pleasing way before you start taking photos.
Here are some suggestions for serving food:
Don’t arrange all foods the same way
Avoid being fussy about the arrangement of the dish's components when photographing food that is more blended, such a salad or soup.
This is not to mean that the food shouldn't be prepared, but you should try to imagine scenes from nature that occur organically, such as a garden with blooming flowers of various colors or a lush forest with gnarled trees.

Neatness in your plate is essential if you're photographing cuisine that's a little more fantastical, like rainbow smoothies or galaxy cakes. Like a painting, drawing, or sculpture, these kinds of foods rely more on the harmony of colors and the accuracy of the lines.

Choose the right surface
You should select serving dishes that best complement the aesthetic of the cuisine and highlight its visual appeal.
When serving food that is more one color, like a loaf of bread, a patterned tablecloth should look great with it. When serving more familiar items like burgers and fries, wooden cutting boards and picnic tables can create a more rustic atmosphere. Foods that are colorful might stand out more vividly on traditional white dishes.

Put your main subject in the middle
People frequently think that whatever is in the center of a food photograph is the main attraction. To guarantee symmetrical food plating, it is recommended to start with the main dish in the center and work your way out, adding sides or garnish.
Think like an artist
Professional chefs methodically decorate their dishes in a creative and exact manner, much like a painter designing a painting, using instruments like spoons, squeeze bottles, tweezers, and even paint brushes. Use sauces and designs to give your plate a creative touch without being frightened to do so.
Good food photographers frequently double as food stylists, even assembling food styling kits, which are collections of accessories and tools for preparing food for photography. Tweezers, paper towels, cotton swabs, and other equipment are often included in kits to aid in the painstaking assembly of your photograph's elements.

After preparing your food for photography, you should start considering the positioning and composition of the final images.
2. Get the lighting right
To highlight the textures and color harmony of your food shot, you'll need good lighting. Consider which aspects of the meal you want to highlight when choosing the appropriate light source. For example, do you want to highlight the juicy quality of a just cooked cut of beef or highlight the distinctive texture of a neatly sliced piece of cheese?
To acquire the greatest lighting for your photo, keep the following in mind:
Avoid lighting from the front
As a result of the tendency of lighting from the front to produce sharp bright areas in your shot, textured foods won't be contrasted to in a way that emphasizes their texture, making them appear bland and tasteless.
Instead, light from the side
A excellent technique to highlight the shadows and bright areas of some food textures, such as bread, meat, and cheese, is to light your food from the side. This is crucial when photographing foods like sandwiches and burgers that balance a variety of textures.

Watch for harsh shadows
While you want to highlight the textures of your cuisine, harsh shadows can be unappealing and off-putting, frequently resembling mold growth. In order to balance the shade in the frame and highlight the texture of the food, alter the angle of your light or camera if you see any harsh shadows.
Use soft, diffused light
Softer lighting can also help to avoid harsh shadows. The greatest place to take a photo outside in natural light is next to a window on a cloudy day. Try employing a low-light or reflecting surface to reflect and diffuse natural light or artificial light onto your subject if you're taking images in a studio.
Use natural light whenever possible
It's not hard to capture a good photo of food in an artificially lit environment, but it does require some additional lighting design expertise. Natural light, particularly on a cloudy day, is bright enough to highlight the textures of your cuisine while remaining soft enough to prevent harsh shadows.
3. Experiment with framing
Not every food photograph employs the same framing. How you frame the food in the photo should be determined by its visual appeal. There is no right or incorrect way to frame a food image, however there are a few considerations to make:
Try photographing from different angles
You should consider what aspect of the cuisine you want to highlight when choosing the angles for your shots. For instance, to highlight the texture and juiciness of the beef in a sandwich, it may be ideal to cut it in half and take the photo from the side.
However, not all foods will respond well to side-shots. To effectively display the intricate details of the arrangement of materials, shots of items like salads or charcuterie boards should be taken from above in a flat-lay technique.

Avert shooting your meal at an angle that is front-facing and downward. Because this is the first viewpoint a person sees when a plate of food is placed in front of them, this is a common mistake committed while photographing food.
The same logic also explains why photographs taken from this perspective frequently lack intrigue. There are undoubtedly exceptions to this generalization, but in general, this viewpoint rarely highlights the nicest textures and lines of the meal.
Use appetizing colors that are true-to-life
When taking food photos, keep color psychology in mind. Gray, black, and blue are typically perceived as the least appealing colors by people, while hues of red and yellow tend to increase hunger.
There are, however, certain exceptions. It is possible to make naturally blue meals, desserts, and candies look enticing. Consider how your photograph's colors complement one another, interact, and contribute to your aesthetic.

Keep the color scheme balanced and attempt to use props or unique textures and patterns in complementary colors to accent your food. Avoid using cooler color filters and keep the saturation of your images high. Under a blue hue, the majority of foods—meats and cheeses in particular—look unpleasant.
Use depth of field to create a selective focus
The distance between objects in the frame and how the focus highlights the nearest portions of the food are both factors in depth-of-field. They have better positions to be in the picture so that it is more focused, much like some dishes have better angles.
Try experimenting with close-up, focussed pictures and backdrops with less focus. Playing around with your images' depth of focus can assist highlight foods with more texture; this effect is particularly effective with pasta dishes.

4. Edit your food photos like a professional
After taking your food photos, you should use a photo editing program to make a few little adjustments. A premium product (like Adobe Lightroom) might be used if you have the money, but there are a ton of free photo-editing software solutions available.
Always exercise caution when editing. Your food photographs may appear strange and unappealing if you overedit them. However, minor adjustments to the color harmony and shading will make your photos appear more polished and expert.
Here's a food shot that we took without any touch-ups to demonstrate what we mean:

The food is artfully arranged, and the composition has some intriguing balance. Let's make some adjustments to the shot to really bring out the flavor of the meal to make it look well-lit and suitable for food photography.
What we did was this:
Sharpen the image
Generally speaking, if you utilized a stable camera and good lighting, your image ought to be fairly sharp. However, making certain changes to the image's sharpness will give the edges more clarity and make it easier to distinguish distinct parts of the picture.
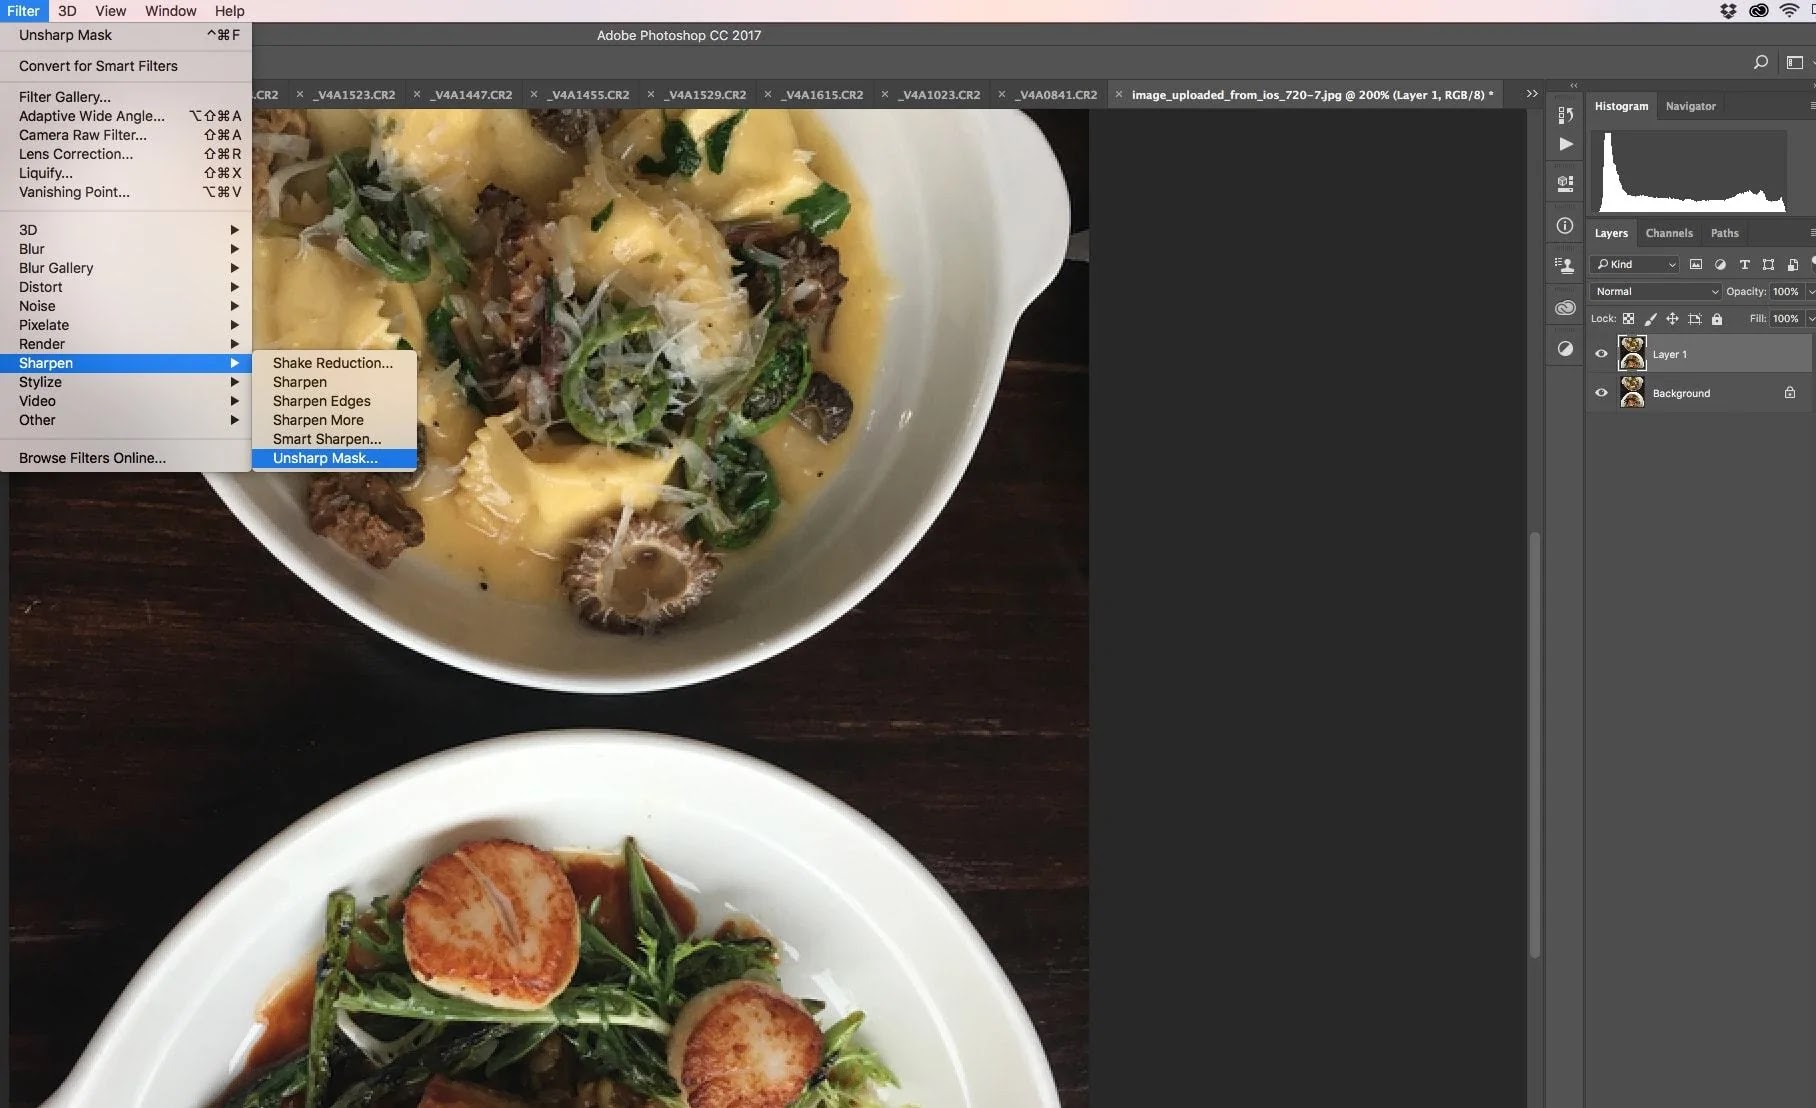
By using an unsharp mask in Photoshop and other photo-editing software, you can sharpen an image. By boosting the contrast between nearby pixels, unsharp mask filters give your image's edges a more defined appearance.

Unsharp masks offer three different ways to adjust:
- Radius: This determines the number of pixels that the filter will influence when applied to high-contrast edges. You can change this to a higher radius of roughly 2 if your image only has a few larger, more prominent objects. Use a smaller radius between 0.05 and 1 for pictures with crisper lines and more detailed details. Due to the numerous sharp lines on the dishes, we used a radius of 0.7 for our image above.
- Amount: This setting determines how much contrast will be given to the image's edges. It's preferable to keep this to a minimum using beautiful food pictures. While this may be effective for some forms of photography, gritty food might appear unappetizing. A high quantity of sharpening can lend a more "gritty" vibe to your images.
- Threshold: This controls how much of the image the filter affects. The filter will be applied to the entire image with a value of 0. High contrast portions of the image will be sharpened while low contrast portions won't be when you change the threshold. Since there are many lines in the sample above, we've left the threshold at 0, but you're welcome to raise it slightly if your food shots include more substantial objects and fewer lines.
Fix the white balance
The white balance of your photograph refers to the hue of the white areas. Depending on how you change the white balance, you can make an image appear more "warm" or "cool."
Using warmer white while photographing food will make it appear more enticing than cooler light:

Depending on the photo editing software you're using, there are various ways to change the white balance. By selecting the image in Photoshop and then choosing Adjustments > Color Balance, you may make this adjustment.

Adjust Brightness/Contrast
The difference between your photograph's darkest and lightest portions is known as contrast. The image will have more information if the contrast between the light and dark areas is increased.

Your photos' brightness and contrast can be changed in many ways using various photo editing applications. To achieve this in Photoshop, choose Layer > New Adjustment Layer > Brightness/Contrast. You will then be presented with a panel with sliders that you can use to change the brightness and contrast of your picture.
Brightness and contrast adjustments can help your shot stand out by bringing out the variety of colors, highlights, and shadows in the scene.
Increase the saturation
The last editing suggestion is to slightly boost the saturation of your photos. The strength of the colors in your shot is referred to as saturation. Remember that warmer, more intense colors are more attractive when it comes to food photography.
Consider the rich hue of juicy, red steak or a slice of a vivid orange mango. A wonderful method to bring out the colors in your shot and make the image look even more mouth-watering is to add a little saturation to food photos.

Even while more sophisticated editing methods may be used by skilled photographers, these simple, minor adjustments can significantly alter how a picture appears:

5. Don’t be afraid to get creative
The art of food photography is not a precise science. While these are some general rules for taking great images of food, don't let them prevent you from experimenting with lenses, lighting setups, and compositions that can give your photography a distinctive touch.
There are a ton of amazing and fascinating ways to play with your food, such as creating desserts that resemble adorable creatures or sculpting a landscape out of food. Your food photographs will stand out if you approach the subject of the food shot in a novel way.
The more distinctive a viewpoint you can incorporate into your food photography, the more likely it is that those social media users browsing through their feed will notice you. And ultimately, what matters most is grabbing people's attention—and hopefully their taste buds, too.